
card. There are lots of ways to do shakers, in lots of different sizes. For the sake of our meeting however, I wanted a simple way to demonstrate one using a square punch to create the window. I had to think about the best way to center the square in the window and evenly at that! Sometimes the stars align and I have a flash of semi-brilliance, LOL. Perhaps this is only new to me but if not, I thought I would share here in the hopes I can save some aggrevation. This is an easy size/shape shaker to make or demo.
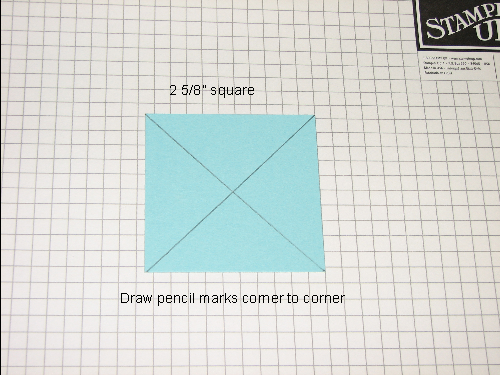
I planned to use Stampin' Up!'s 1 3/8" square punch and the foam tape I had was 1/4" wide so I cut my cardstock for the frame 2 5/8. That will make the frame a smidge wider than the tape.
Use a pencil to draw lines going from corner to corner. This will be the back so no worries about erasing your lines.

Holding your punch (in this case 1 3/8" ) upside down, center your cardstock so the lines meet all four corners. I placed my finger on the X to hold the cardstock in place. Clamp down on the punch, do one final check to make sure your corners are still in place and punch out the square.

This is what your end result will look like, a perfectly aligned window!
TIP: You can use the backside of your window as a guide for stamping your image so it will be centered in the end. I cut my cardstock for stamping 2 1/2" square, just a smidge smaller than the window.

Cut a piece of acetate just a smidge smaller than your window. I use mono adhesive on the back side of my window and adhere the acetate.
Apply foam tape on all four sides making sure there are no gaps in your seams to let your filling escape.
Place filling inside your window, in this case I used small clear beads. Other filling ideas include sand, colored beads, confetti or small embellishments.
Peel the backing from the foam tape and adhere your stamped image so it appears through the window.
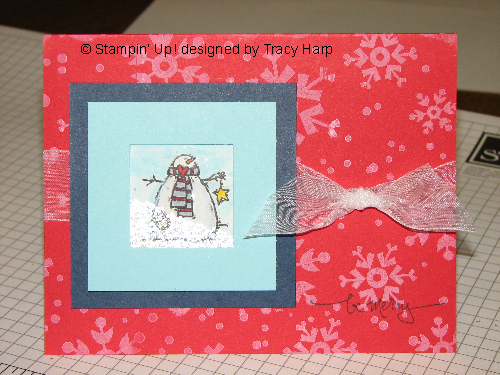
Finish your card. I placed my shaker on a larger mat just so I could add another layer of color.
TIP: you can also stamp in Stazon on the acetate to add another layer of interest to your shaker.
For example, the words "let it snow" would have been cute on the acetate layer of my window. Note to self: buy a "let it snow" stamp
2 comments:
Thanks for the great photos of the steps. I've read about doing shaker cards but hadn't actually done one. Your tutorial is great!
Thank you for a great tutorial on shaker cards. You took a lot of the mystery out of the directions. I now feel confident enough to try one.
Post a Comment