Showing posts with label 3-D. Show all posts

Tuesday, December 06, 2011

Frosted Frosty Pin

This time of year there are lots of arts and crafts shows to browse. I recently attended a great show and found lots of great items to inspire me. There was jewelry made of sea glass, wine accessories made of cork, wonderfully knit items and so much more. The talents of some folks just amazes me! And inspires me!

I have a box full of glass slides and copper foil that I have used to create pins with over the years. I was inspired to drag out that box and create something new. This time I used a Stampavie image called "Snowy Cuddles" by Penny Johnson.

The top piece of glass is a frosted piece measuring 2" square, made by Inkssentials (a Ranger product). The image was embossed onto the frosted side using clear embossing powder. This technique originated with Ellen Hutson many moons ago. The frosted glass adds a very fun dimension to the finished piece. Of course, you can always use clear glass as well.

The image was stamped and colored with Copics before sandwiching it between the 2 pieces of glass. I added a piece of pattern paper to the back to hide the bleeding markers. The pin back was glued on with SU's Crystal Effects.

They also make nice magnets!

Now that it is all done and assembled I wish I had given them rosey cheeks! Oh well, guess I will have to make another ;).

Monday, December 05, 2011

White Elephant

Today we are having a gift exchange at work. The kind where you bring something wrapped, you draw numbers and when it is your turn you choose a gift or perhaps steal one from someone else. Our spend limit is $10.00. If I wanted to make sure my gift was a hot ticket I would wrap up a bottle of wine or $10.00 in lottery tickets. Instead I made some items to go along with some fancy hand soaps and lotions.

You know you are a crafter when.... your gift begins with the wrapping, lol! I loved this idea from Tosha. Being fresh out of kraft bags, I used a white one I had. It was too WHITE to leave be, so I covered the front with some fabulous new October Afternoon papers. I apologize for the sorry photos! The top of the lid has the same paper that I used on the tag. I stitched. I added punched borders. I added sparkle. I spent way too much time on the wrapping. But it was fun.

The gingerbread man is a Sizzix die. I adhered the paper to a medium weight coaster before cutting it out. I "sugared" the whole tag with some glass glitter.

I included a matching magnetic list pad and a set of Hershey nuggets wrapped in a tin.

Making little gifts is so much fun!! Hopefully they will also be enjoyed by whoever gets them!

Monday, November 21, 2011

Crafty Hair Accessories

We have 2 sons and I love them dearly. My husband, the gem that he is, has taught them to ooh and ahh over my creations and to even seem to appear interested. But they are teenage boys after all. My crafting does little for them and there is little I can make for them personally. Now my baking talents are a whole other ball of ribbon, lol.

I do however have 2 young nieces and for Christmas this year I am having a ball putting together little bags of do-dads for them. I do a LOT of couponing so have scored free lip glosses, eye shadows, nail polish, hair brushes, etc. I made some cute hair accessories for each of them using some of the items in my craft room.

One of the girls loves pink and the other purple. The pink flowers are from Stampin' Up and the purple ones are from Prima. I simply glued them onto some hair pins I picked up from Hobby Lobby. The tags were simply stamped in coordinating colors onto shipping tags.

So simple but fun! I hope they like them.

Thanks for visiting!

Friday, November 18, 2011

40...Something

In my office we hold a monthly food day to celebrate those with a birthday that month. One of our staff is turning 40 so as a little gag, we brought little bags of 40 "something". We had bags of 40 almonds, 40 pieces of yarn, 40 leaves and various other items. It wasn't intended to be anything fancy or costly, just imaginative.

This staffer happens to be on Weight Watchers and she has given me charge over her bag of dark chocolate Dove candy. I dole out 1 piece a day. Yep, call me the Dove Nazi, lol. The best part is I can help myself when ever I want. For a biggie birthday like 40 it seemed only appropriate to gift her 40 Dove chocolates!

They didn't fit nicely in a Ziploc so I packed them in a medium sized kraft lunch sack. The crafter in me couldn't leave it at that. I gussied up a clothes pin and added a tag. I took the negative created by the flower die and used it as a stencil on the tag. The sentiment was a no brainer, lol.

Easy Peasy lemon squeezie!

Curiously, she has not brought back the bag to be rationed ;) I guess I'll let it go this time.

Thursday, November 17, 2011

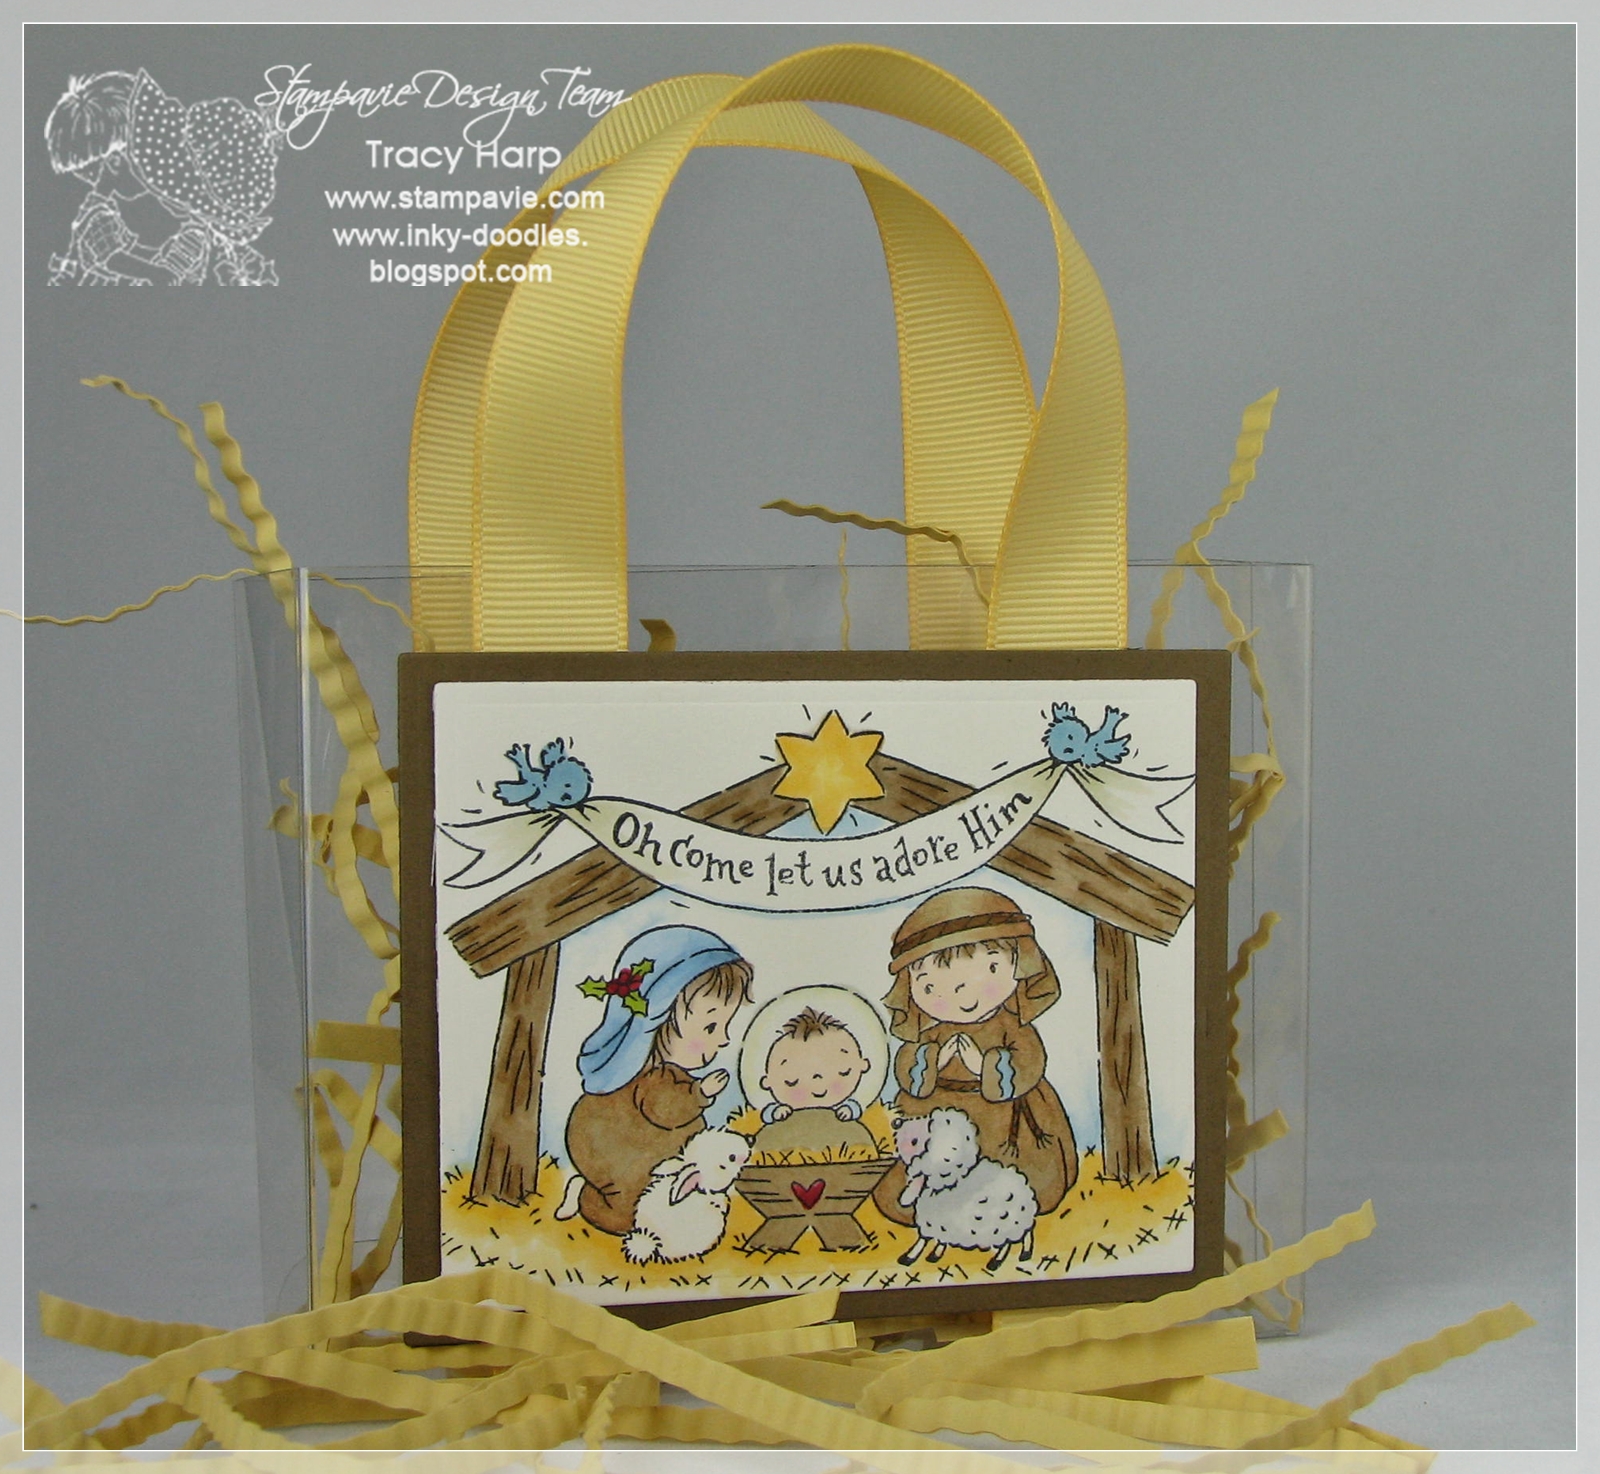
Stable Box

I can't believe that Thanksgiving is now just a week away. That means Christmas is around the corner. Each year it seems to fly at me at a faster rate! Much of my shopping has been done and this year I am also going to try to do the wrapping a bit ahead. I am usually the one wrapping, decorating, baking and cleaning all in one last mad dash the day before.

Here is a small bag I made that will nicely hold a gift card and some small candies.

The image is called "Away in the Manger", from Stampavie's Tina Wenke collection. I colored it mostly with Letraset Promarkers. The acetate "bag" is half of a A2 card size box with wide ribbon attached for handles. I thought I had some kraft colored filling (note to self: buy Christmas wrapping supplies!). Next best thing...the scrap pile! I cut and crimped several slivers of so saffron card stock. At first I thought it looked like straw which matched the scene in the stamp. Now I think it looks like crinkle cut french fries, lol! I must be hungry.

Simple & fun!

Monday, October 31, 2011

Boo!

Happy Halloween!

Just dropping in with a little gift bag I made.

This one is easy peasy! Start with a piece of 8 1/2 x 11. Score the long sides 2" from each side, then score the shorter side at 4 1/2 and 6 1/2. Cut in to create the flaps for the box and adhere. Add a handle of your choosing and done! My handle is attached with brads so the handle moves out of the way to access the goods!

The image is called "Batty" from Stampavie's Penny Johnson line. He was colored with Copics. I cut the flags for the banner by hand and added foam letters, assembled it with brads and a bit of orange twine. The top spider web border was punched and added after the box was assembled.

Have a great day, I hope you get nothing but treats!

Wednesday, September 21, 2011

All Prettied Up

Hello! Have you adjusted to your fall routine yet? We are working on it at our house. Eldest son's last minute decision to play JV football is throwing us for a loop but as with most things, we just roll with it. The sleep in until the very last minute and then rush like a mad man so they don't miss the bus and have to pay the Dad taxi $5 for a ride to school routine is what makes me crazy.

I wanted a little something for the boss lady who is celebrating a birthday. I finally tackled my pig sty of a stamp room last night and had just a wee bit of time to put a gift together.

Remember this card from last month?

Well, I recently purchased these fun, vintage style bottles of lotion and hand soap by JR Watkins. Smelly lotions are a nice gift right? These particular ones are lemon scented.... so wonderful! They just needed a little dressing up to make a match to the card.

The covers will easily slide off so the products can be used. Easy Peasy.

Gotta run!

Thanks for visiting!

Thursday, September 08, 2011

More Milk Carton Creations

Over the summer I had some friends over to stamp and we made some gift boxes using SU's milk carton die. I already loved the various things this die could do, like the cute little bird houses I am sure you have seen. Using 2 die cuts to make these treat boxes just makes it so much more versatile. You may have seen this post of mine from July where I made a bee hive.

Here is the box we made using some old SU designer paper and some die cut flowers using a die from PTI.

Here is a taller version which requires that you create an outer layer to go around the assembled cartons. I will be honest, I had a really hard time getting a good fit and the perfectionist in me about lost her mind, lol! The above method of covering it with thinner weight pattern paper was much easier.

When we were assembling the tops, one of us (who will remain nameless) folded the score lines in the opposite way as everyone else. It was one of those happy kind of mistakes because it created a star box top instead. It was really cool! No ribbon required. We didn't get a picture of it and I have not had time to make another one myself. Just wanted you to know you can create 2 different looks from the same box just by folding the top differently.

If I were mass producing these on ANY scale, I would go with version #1. If you want to pull out a few hairs, preferably the gray ones, then try #2. Maybe you will discover it isn't that bad and I am just a moron. Completely possible ;)

Friday, August 19, 2011

The Good, The Bad, & A Tutorial Revisited

Were you a fan of CHF?? Are you still mourning the retirement of some of their images?? I still have people offer to buy some of my backgrounders and sets. Well, then you may be glad to hear that Stamper's Ink has purchased the CHF line. They have not rolled out all the deets yet, but you can poke around their site to read a bit about them and their plans. I am glad to know these fabulous images are being given new life! That is the good news.

The bad news is that they have taken down the old site, gallery and even the blog. Maybe they will bring some of it back. I am really bummed about all the great tutorials that were available, the blog and website were a great resource!

Yesterday I got an email from Heidi looking for one of the tutorials I posted on the CHF blog. Well, I had the photos but none of the text. What was I thinking???! Here is a recap of my:

Jam Box

You will need a few supplies...
12x12 card stock for box
5 1/8" square piece of card stock for lid
1x12 strip of card stock for the handle
scoring tool
sticky tape
brads
Score the 12x12 card stock at 4 1/2" and 7 1/2" in each direction.
Cut along lines on opposite sides, up to first score line, as shown in photo below

Cut away 2 1/2" of the outer corners as shown below, leaving 2" sides. Trim corners so they don't bind when assembling the box.

Add sticky strip to the sides as shown and assemble the box

Score the 5 1/8" piece for the lid at 1" on all sides

Cut tabs like shown below, add adhesive and assemble lid.

Cover the panels of the box with patterned paper.
The handle is a strip of 1"x12" long, attached to the box with brads.

Here is another box I made, it is simply covered with some designer paper and accented with ribbon and a tag.
I also posted these, used to package ornaments rather than jam. Really, the boxes can work for many different things. You could even use a die cut to create a window in the front of the box but I would only do that if the contents aren't super heavy or it might compromise the strength of the box.
Here is a modified version I posted back in June. The box is made from a 9" square piece, scored at 3" and 6" in both directions.

Oh the days when I had time to tinker! I haven't even canned a single jar of anything this year. Revisiting this post has inspired me though. There is still time for salsa and peaches!

Enjoy!!

Thursday, July 21, 2011

The Bee's Knees

Don't fall off your chair, but YES, this is the third post from me this week!

There are birthdays, weddings and baby's all around so I kicked my card making into high gear. I can't very well show up to all these events with store bought cards now can I? Now my smarty pants son would tell me that I "can" but "choose" not to. Semantics!!

I used the I Love Honey image by Penny Johnson to make this card and gift set for my friend Lynn's birthday last week.

I was totally inspired by the milk carton die creations seen here and here. That SU milk carton die makes such great projects, I loved that there was an idea out there I had yet to see or try. Now I will say that the brown "sleeve" around the outside was a bit putzy to get right, I think I re-did the score lines 3 times before I had a snug enough fit for my liking. When I first saw the samples, I made one that I covered with DP but in my mind I saw a bee hive. The honeycomb stamp is a Scrapblock from CHF but inked up bubble wrap can also make a good alternative. The chocolate panel on the card is embossed with a Cuttlebug bee folder. I altered the tag on the honey pot so I could add in my own sentiment. To omit the words on the original image, I just colored the outline of the tag with a black marker, stamped it onto a piece of scrap paper and cut it out. It is attached with dimensionals for lift.

The box held a handful of dark chocolate Dove candy. I suppose some Bit 'O Honey candy would have carried the theme through even better. Maybe next time!

Tonight my mother arrives from Germany for a visit. Hubby and the boys will be driving to Toronto to pick her up. I will be at a training for work all day ;(. Then we will get packed up for a week at the lake. I do have some creations left to show you, so stay tuned.

Thanks for buzzing by!


Thursday, June 16, 2011

Homemade Gifts

Nobody likes a Wendy Whiner so I have tried to keep my grumbling to a minimum here. The busyness of life and work has really been taking its toll on me. My creative time has become very limited and when I try, the ideas and creativity seem to flow so slowly that crafting has become painful and anything but enjoyable. I have even entertained the idea of quitting altogether but I know I would miss it.

Last night I worked on a project for the Stampavie blog and I had a thoroughly enjoyable time!! Nothing super novel or exciting, in fact I used a box/basket idea I have done before. But I took my time and just puttered away until I was pleased with the end result.

The image is called "Adele Enjoys Fresh Apples" from the Sarah Kay collection. The recently purchased package of Spellbinder Apple dies happened to be nearby so I incorporated the medium size into the design. Yep! That is more of my sloppy stitching, lol. I'm gonna make it my signature look ;)
I did this tutorial on the CHF blog awhile back. The above box is just a modified version with an open top. Instead of a 12" piece, I used a 9" square piece, scored at 3" and 6" in both directions, cut on the score lines on opposing sides and assemble. The handle is just a strip of cardstock attached with brads.

Here is a close up of Adele...

I originally made the box to fit a canning jar and this one has a jar of my jam inside. The box/basket is good for so many goodies so don't just think canning jars.

It felt so good to enjoy my creative time rather than walking away frustrated! There is hope.


Tuesday, April 05, 2011

Under My Umbrella

Rain, rain go away, go to Texas where they need it! We are once again putting on our rain jackets and waders. Well, I hope this red and yellow gift bag will bring some cheer.

The image I used is called "Under My Umbrella", part of the Gillian Roberts collection at Stampavie. Hers must be a sun umbrella though, 'cause it doesn't appear to be raining on her parade.

I had colored this image and tried for what seemed like forever to make it work on a card. It was like pulling teeth I tell ya! Ever have those days in your crafting?? Pushing a rock uphill. It wasn't the image, it was the elements I was trying to put together. I set it aside and started to rummage around drawers for who knows what. I came across some leftover class projects, including a white lunch sack cut down for a bag project. Now the pieces just seemed to fall into place and the whole experience was so much more enjoyable. The card stock pieces are 5" square with the bag sandwiched in between. The handles are 11" by 1", fastened with brads and a bit of tape. I embossed the front panel with a dotted Cuttlebug folder.

That is it for me. Today is day one of 3 days of training at work. The county is finally trying to go computerized. No more DOS. Can you imagine the fun I am going to have????

Monday, April 04, 2011

Happy Thoughts

Last month I bought this cheery paper at my LSS. I knew I wanted to use it on some kind of project where the paper could be one of the focal points. Once I got it home, I was totally uninspired to use it. Then today my son discovered a ladybug while at church. A sign of spring? Probably not since it was a dead one, lol. Anyway, I pulled out a 1/2 composition book and used the paper to create a little journal.


The image is by Stamping Bella. I colored her with Copics and used a black glaze pen on all the dots. The sentiment is by Amuse. When the composition books are on sale around back to school time, I have a stack cut in half at the office supply store. They make fun projects and nice gift. The back cover has the same paper covering it and the insides are covered with old olive card stock for a finished look.

I'd keep it for myself except that I am a lousy journaler. It would end up like all my other attempts, the first few pages would be written on followed by a whole bunch of blanks! So, I will set it aside and gift it when the opportunity arises.

Thanks for visiting!

Friday, March 11, 2011

Hippity Hop

Today is release day over at Shady Tree Studios!

I have another sample using the Backyard Springtime set. Are you seeing how versatile this set is yet?

The fence is one image in the set and the bunny is another. You can easily repeat the fence to make it longer. I paired my images with some Cosmo Cricket paper from last year. The carrots on the DP are meant for this little bunny.

I used the same 2 images to create the scene on this basket.

The fence is extended here by stamping it 2x's. I changed the color of the bunny to grey and used some liquid applique on his tail. I got a bit carried away with the heating so he has an extra fluffy, coiffed tail, lol. The eggs are part of a Sizzix die I have, I cut them from white cardstock and colored them with Copics.

I hope you enjoyed the sneak peeks!

Thanks for visiting.

Saturday, February 05, 2011

PTI Favorites

I am so happy that today is Saturday! Because inquiring minds want to know, lol, the dog is no longer having plumbing issues, oldest son is starting to feel a bit better and husband is well....surviving. He is in quite a bit of discomfort from the stent and procedure. Not entirely unexpected I guess. He's walking like a 90 year old man. Kinda funny, but not to him, sheesh!

Paper Trey is doing a year in review and they are inviting customers to share their favorites from the past year too. I browsed through my PTI creations from the last year and had a tie for my favorite! This one I just post a couple of weeks ago.

I liked it when I made it but it has grown on me even more since then.

My second favorite uses one of PTI's templates. I don't think it was a new product in 2010 but I used for the first time in July to make a gift for a new family in town.

No stamping, just the template, lots of dies and embossing folders. I loved that project!!

Today is dedicated to getting things done around the house and hopefully no one will notice when I sneak away to my stamp room :)

Sunday, January 30, 2011

Chic Purse

A big round of cheers for me please...I finished preparing our stuff to take to the tax man! Life can now carry on and maybe I can even do some stamping!

I thought I would make up for my lack of posts by posting over the weekend. Today I have another CHA Stampavie sample to share. This one uses one of the new Sarah Kay images.

Of my 8 projects for CHA all were cards except this one. I turned this project into a purse, it just seemed fitting. The front and back panels have a box sandwiched in between and you can fit a good amount of goodies inside. I made up the pattern as I went and since the sample is on display at CHA, I can't even offer dimensions. The handle is black grosgrain ribbon. I added a felt flower and paper flowers by MM and a pearl stick pin. The flourish is a Sizzix die. There is stitching along the edges and the top panel is embossed with a little ink to brushed over to bring out the design. Click on the photo for a bigger view.

This project was fun to put together and I have to give a shout out to my sister-in-law. She was visiting when I made this and we bantered back and forth about all the details. It was a joint effort!

I have another recipe card to share tomorrow. Mmm, Mmm good!